
Say goodbye to useless programs and hello to a more responsive user experience.
Whenever you purchase a new Windows laptop or pre-built desktop, there’s a chance that it will come with some annoying pieces of bloatware installed. Bloatware can (and often does) have a negative impact on your user experience, but what exactly is bloatware? Why do PC manufacturers install it? And most importantly, how can you permanently remove it from your machine?
If you find yourself asking these questions, don’t worry — we’re here to help. In this Windows 11 guide, we’ll go over everything you need to know about bloatware, including how it could affect your system, why companies pre-install it, and several methods that you can use to get rid of it for good.
WHAT IS BLOATWARE?
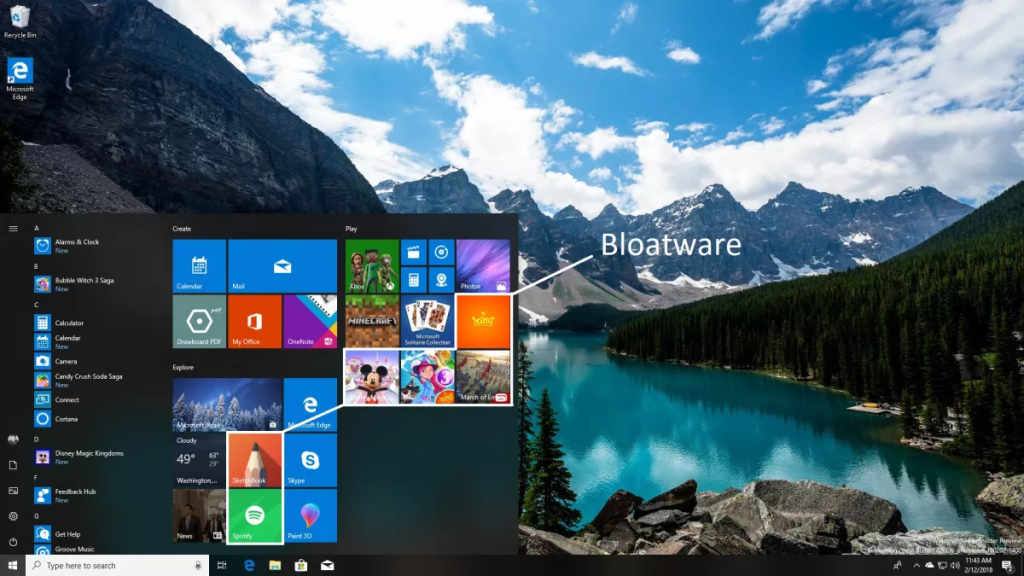
Put simply, bloatware is a term that refers to pieces of software that hog your system resources and clutter up your PC, “bloating” it (hence the name). As a result of this, bloatware often makes your machine take longer to boot up, slows it down by using up a considerable portion of its available memory, and makes it harder for you to navigate the Windows operating system due to pop-ups or program icons that dominate the Start menu.
There are many different kinds of bloatware. Some pieces of bloatware are trial versions of anti-viruses that attempt to scare you into signing up for a paid subscription, warning you that your PC will be at risk without one (the Windows Defender software Windows comes with is all the vast majority of people will need). Others are utility apps, such as video editors or file management programs. Pre-installed entertainment apps like Netflix and Disney Plus, as well as cheap free games that get loaded onto your system before it gets into your hands, are also considered bloatware. While these programs may be useful to some users, you should remove them if you don’t have plans to use them.
It’s important to note that while pieces of bloatware pre-installed on your system are annoying, they won’t put your digital security at risk. After all, manufacturers would land in some pretty hot water if they sold PCs that handed personal data over to bad faith actors. With that said, you should still get rid of it, as you want the Windows user experience to be as clean and responsive as possible. Pieces of bloatware you may accidentally download from the internet can be dangerous, though, so when you start using Microsoft Edge to browse the web, do so carefully.
WHY DO MANUFACTURERS INSTALL BLOATWARE?

You may be wondering, “if bloatware is so annoying and everyone wants to get rid of it, why do manufacturers bother installing it in the first place?” Like many things, the answer is that it’s for the money. Software developers pay PC manufacturers to install their programs on each of the machines they sell, which helps them expand their user base and advertise the paid versions of their apps and programs.
Over the years, many manufacturers have significantly reduced the amount of bloatware they install in response to criticism from customers. However, some companies still add plenty of it to their PCs — including some of the best Windows laptops on the market — so it’s important to know how to get rid of it in the event that you buy a device from one of them.
HOW TO REMOVE BLOATWARE WITH WINDOWS SETTINGS
The easiest way to get rid of bloatware is to use the program uninstallation tool that’s built into Windows. Here’s how to do it:

- From your desktop, click the Windows icon on your taskbar to open the Start menu.
- In the search bar, type Add or remove programs.
- Select the Add or remove programs result that appears.
- In the “Search apps” search bar, type the name of the bloatware you want to remove.
- Select the three dot icon to the right of the bloatware’s name.
- Select Uninstall.
- Select Uninstall again when Windows asks you for confirmation.
- If a pop-up appears and asks if you’d like to allow an uninstaller to make changes to your system, select Yes.
- If an uninstaller appears and asks for additional confirmation you’d like to remove the program, select Yes or Uninstall.
And with that, you have successfully uninstalled the piece of bloatware from your PC. Make sure to repeat this process for each individual app or program that you’d like to get rid of.
HOW TO REMOVE BLOATWARE WITH WINDOWS POWERSHELL
If you’re unable to access the apps portion of Windows Settings due to an issue or would prefer an alternative method, it’s also possible to remove bloatware with Windows PowerShell, a command-line scripting language included in Windows. Here’s what you’ll need to do:
- From your desktop, click the Windows icon on your taskbar to open the Start menu.
- In the search bar, type Windows PowerShell.
- Right-click the Windows PowerShell app search result that appears.
- Select Run as administrator.
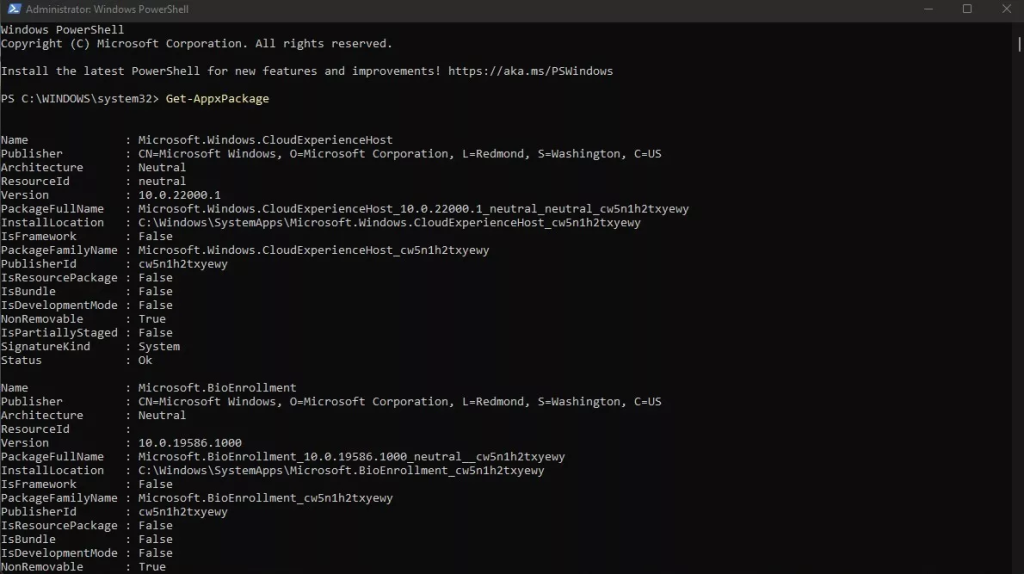
- When Windows PowerShell opens, type Get-AppxPackage
- Next, press the Enter key.
- Scroll down, looking for the name of the bloatware program you want to remove.
- Replacing <AppNameHere> with the name of the bloatware, type Get-AppxPackage *<AppNameHere>* | Remove-AppxPackage
- Press the Enter key.
Using PowerShell to get rid of bloatware takes more effort, but since it doesn’t require you to click through a program’s uninstaller, it’s useful in situations where a piece of software throws multiple pop-ups during the uninstallation process to make it harder to remove.
HOW TO REMOVE BLOATWARE WITH COMMAND PROMPT (CMD)
Finally, you can also utilize Command Prompt (often referred to as CMD), a command-line interpreter that’s included with Windows installations just like PowerShell is. Here’s how to get rid of bloatware with it:
- From the desktop, use the Windows key + R keyboard shortcut.
- After the “Run” window appears, press Ctrl + Shift + Enter to run CMD as an administrator.
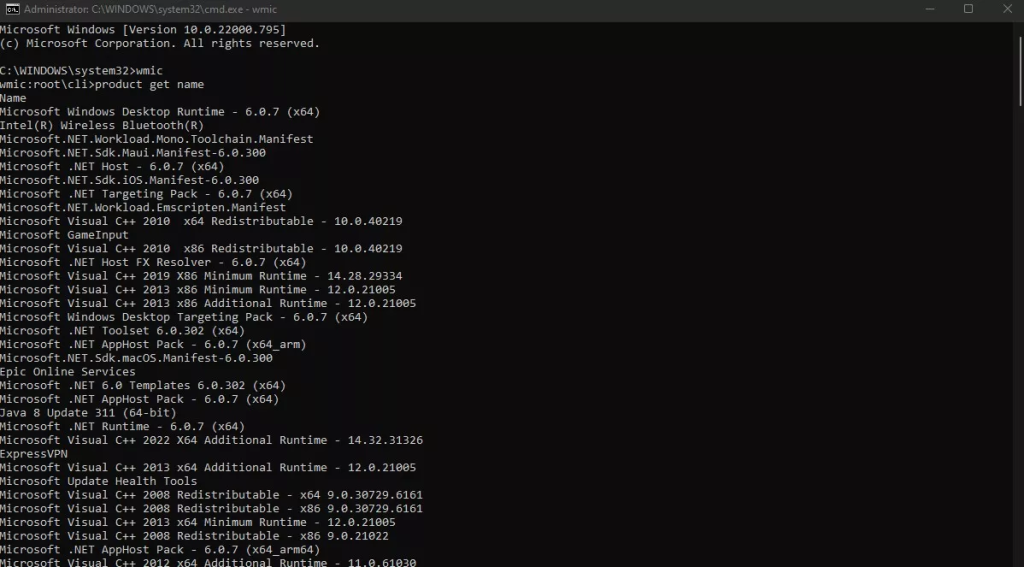
- Type wmic
- Press the Enter key.
- Next, type product get name
- Press the Enter key.
- A list of programs installed on your PC will be shown. Note the name of the bloatware program you want to remove.
- Replacing <AppNameHere> with the name of the bloatware, type product where name=”<AppNameHere>” call uninstall
- Press the Enter key.
- You will be asked to confirm the uninstallation. To do so, type Y.
- Then, press the Enter key.
Following this, you’ll see a “Method execution successful” response from CMD, confirming that the bloatware has been successfully removed from your system. Note that while using CMD to remove bloatware requires a few extra steps compared to using PowerShell, the commands you need to use are also less complicated.